
Easy MTD VAT Help
For version 2 and below
Welcome to the Easy MTD VAT help.
This help is for Easy MTD VAT version 2 and below. If you are using Easy MTD VAT version 3 or above, please click here to view the help.
Contents
- Introduction
- Getting Started
- System Requirements
- Downloading
- Installing
- Uninstalling
- Launching
- Updating
- Notifications
- Interface Overview
- Specifying Account Details
- Buying Submission Tokens
- Specifying Proxy Settings
- Data Files
- Viewing Software Credentials
- Managing Clients
- Granting Authority to Easy MTD VAT
- Managing Obligations, Payments and Liabilities
- Submitting a VAT Return
- Troubleshooting
Introduction
Easy MTD VAT is a Windows application that enables you to view VAT obligations, payments and liabilities, and digitally submit VAT returns (open obligations) to HMRC in compliance with their Making Tax Digital for VAT service. Whether your business records are kept in an accounting package or a spreadsheet, Easy MTD VAT can import the required VAT figures and submit them to HMRC in just a few clicks.
Getting Started
The Getting Started section will guide you through the fundamentals of downloading, installing, updating and specifying account details, and provides an overview of the Easy MTD VAT interface.
System Requirements
Easy MTD VAT has the following minimum system requirements:
- Windows 8, 8.1, 10 (32/64 bit)
- United Kingdom (£) currency format set for Windows
- Internet connection
Downloading
Easy MTD VAT can be downloaded from the following web page:
Installing
After downloading Easy MTD VAT, install it by opening the Easy_MTD_VAT_n_Setup.exe (found in the download folder of your browser).
The installation process is straightforward and you will be guided through each step.
NOTE: To ensure the setup has not been tampered with and is created and published by Fly Software, "Fly Software Ltd" will appear as the Verified Publisher in the Windows User Account Control window that is opened at the start of installation.
Default Folders
Easy MTD VAT program and configuration files are stored in the following default folders:
- C:\Program Files (x86)\Easy MTD VAT
- C:\ProgramData\Easy MTD VAT*
NOTE: For details about changing the folder where client and agent data files are stored, refer to Data Files > Changing the Data Folder.
Uninstalling
Easy MTD VAT is uninstalled using the Windows uninstall program feature.
Launching
Easy MTD VAT is launched by opening the Easy MTD VAT program found on the Windows Start menu or desktop.
Sign Up Notification for Making Tax Digital for VAT
NOTE: As of 01 November 2022, there is no requirement for a business to sign up for Making Tax Digital for VAT.
Following launch, a Making Tax Digital for VAT window (see fig. below) is opened (unless flagged to not show again) that notifies you that your business or your client(s) must be signed up for Making Tax Digital for VAT before VAT returns can be submitted or VAT obligations, liabilities and payments can be viewed.

Fig. Making Tax Digital for VAT window
Click the Sign Up button to visit the HMRC web page where sign up for Making Tax Digital can be performed. Click the Close button to close the window.
Click (tick) the Do Not Show check box if you do not want to see the window again.
Updating
Easy MTD VAT is sometimes updated to fix issues and introduce new features. When this occurs an Update window is opened after Easy MTD VAT is launched or by clicking the Updates option on the Help menu. Click the Download button to open the Update page on the Easy MTD VAT website and automatically download the update, or the Close button to close the Update window and continue using Easy MTD VAT without updating.
Critical Updates
Occasionally, Easy MTD VAT may require a critical update. When this occurs, a Critical Update Required window is opened after Easy MTD VAT is launched. Until Easy MTD VAT is updated, the Critical Update Required window will continue to be displayed and Easy MTD VAT cannot be used. Click the Update button to open the Update page on the Easy MTD VAT website and automatically download the update, or the Exit button to close the Critical Update Required window and exit Easy MTD VAT.
Notifications
When Fly Software need to notify you about important information such as HMRC system downtime, a Notification window is opened after Easy MTD VAT is launched. Click the OK button to close the Notification window.
Interface Overview
The following screenshot (see fig. below) and table describe components of the Easy MTD VAT interface.

Fig. Easy MTD VAT interface
| A | Title Bar | Identifies the software and provides buttons to minimise, maximise and close (exit) Easy MTD VAT. |
| B | Help Menu | Provides options for accessing the help, Account window and About window, checking for an update, visiting the Easy MTD VAT website and buying submission tokens. |
| C | Client | Includes a Client list box for selecting a client, and provides buttons for adding, granting authority to Easy MTD VAT, modifying and deleting clients. |
| D | VAT Details | Displays open obligations, fulfilled obligations, payments and liabilities for the selected client between the indicated From date and To date. Buttons are also provided to submit an open obligation (VAT return) and view submission receipts and figures of fulfilled obligations. |
Specifying Account Details
To enable you to submit VAT returns (open obligations) you need to specify your Fly Software account email and password in Easy MTD VAT.
Click the Account option on the Help menu to open the Account window (see figure below).

Fig. Account window
Specify your email and password then click the OK button. If the email and password are valid they are saved and the Account window is closed.
If the email and/or password is invalid, a Warning window is opened notifying you of this. click the OK button to close the Warning window and specify the correct email and/or password.
NOTE: The password is case sensitive.
NOTE: The Account window is also opened when you attempt to submit a VAT return if an account email and password have not been specified.
Resetting Your Password
If you forget your password, you can reset it by clicking the Forgotten Password link in the Account window or the Login window of the Easy MTD VAT website.
Buying Submission Tokens
Before a VAT Return can be submitted using Easy MTD VAT, one or more submission tokens must be available in your Fly Software account. To buy one or more tokens click the Buy Tokens option on the Help menu or visit the following web page:
Specifying proxy Settings
If the computer Easy MTD VAT is installed on uses a proxy server to connect to the Internet, proxy settings will need to be specified before authority can be granted, VAT data can be viewed and VAT returns can be submitted.
To specify proxy settings, click the Proxy Settings option on the Help menu. Following this, the Proxy window (see figure below) is opened.
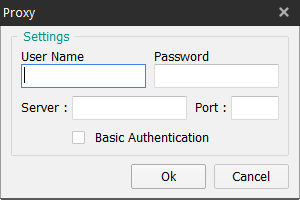
Fig. Proxy window
The following proxy settings are provided:
| User Name | Determines the user name required to connect to the proxy server. |
| Password | Determines the password required to connect to the proxy server. |
| Server | Determines the name or IP address of the proxy server. |
| Port | Determines the port number of the proxy server. |
| Basic Authentication | Determines whether basic authentication is used to connect to the proxy server. |
When all required fields are specified, click the OK button to save the proxy settings and close the Proxy window.
Click the Cancel button to close the Proxy window without saving changes to the proxy settings.
Data Files
Easy MTD VAT stores data relating to clients and agents within two data files called Clients.dat and Agents.dat. By default, these files are stored in C:\ProgramData\Easy MTD VAT\.
The following data is held in each file:
| Clients.dat | Client Name, VAT Registration Number, Additional Information, Agent Reference, Authority Tokens, Spreadsheet Configuration Settings. |
| Agents.dat | Agent Reference, Authority Tokens |
The data files are stored locally (i.e. not in the cloud or on the Easy MTD VAT server) to maintain the privacy of the clients you add to Easy MTD VAT. It is therefore advised you back up these data files from time to time in case the PC/laptop where Easy MTD VAT is installed becomes inaccessible.
Changing the Data Folder
The data folder where Clients.dat and Agents.dat files are stored can be changed to any folder accessible to the PC/laptop where Easy MTD VAT is installed. For example, for backup purposes it may be preferable to have the files stored in a documents folder or a network folder.
To change the data folder, perform the following actions:
- Click the Help menu.
- Click the Data Folder option to open the Data window (see Fig. below).
- Click the folder icon to the right of the current folder path and name to open a Select Folder window (see Fig. below).
- Locate the required folder within the file system then click it to select it.
- Click the OK button to close the Select Folder window.
- Click the OK button to close the Data window.
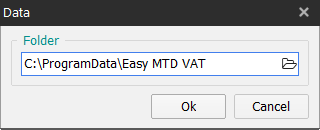
Fig. Data window

Fig. Select Folder window
Specifying a new folder will automatically create new Clients.dat and (if applicable) Agents.dat files if they do not already exist and populate them with the client and agent data currently held in the Easy MTD VAT interface. If Clients.dat and Agents.dat files already exist in the new folder then the data currently held in the Easy MTD VAT interface will be merged with the data already in the files.
Viewing Software Credentials
To view the version number of Easy MTD VAT, the Fly Software account Easy MTD VAT is associated with, and how many submission tokens you have available, click the About option on the Help menu. Following this, the About window (see figure below) is opened.
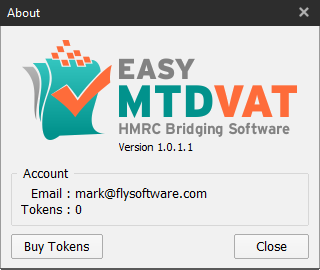
Fig. About window
Click the Close button to close the About window.
Managing Clients
The term client refers to a VAT registered business for which you want to submit a VAT return and display obligations, payments and liabilities. This business can be your own or a business you are authorised to manage as an agent.
Adding
To add a client to Easy MTD VAT, click the Add button. Following this, the Add Client window (see fig. below) is opened where you specify client details.
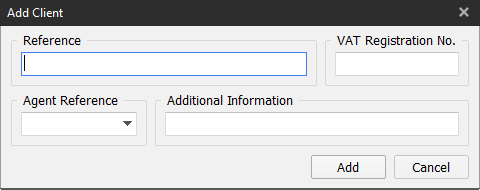
Fig. Add Client window
| Reference | Identifies the client in Easy MTD VAT and is the name that appears in the Client list box. If you are an individual this will normally be the name of your business. If you are an agent this will normally be the name of your customer's business and perhaps other identifiers such as a customer number. |
| VAT Registration Number | If you are an individual this is your own VAT Registration Number. If you are an agent, this is the VAT Registration Number of your customer. It is important to specify the VAT Registration Number correctly. If specified incorrectly it prevents Easy MTD VAT being granted authority to interact with HMRC for the client. |
| Agent Reference | If you are an agent acting on behalf of one or more clients, an Agent Reference should be specified or selected so Easy MTD VAT can be granted authority to interact with HMRC for all eligible clients with the same Agent Reference. |
| Additional Information | Any other information or notes. Optional. |
When all required fields are specified, click the Add button to add the client and close the Add Client window.
NOTE: The Add Client window is also opened when you launch Easy MTD VAT if there are no clients already added.
Selecting
To display client obligations, payments and liabilities, to modify and delete a client, and to grant authority for Easy MTD VAT to interact with HMRC for a client, the client must first be selected.
Click the Client list box arrow, locate the client Reference then click it to select it. Alternatively, start typing the Reference to automatically populate the list box with a matching client.
The VAT Registration Number, Agent Reference (if specified) and Additional Information (if specified) are displayed below the Client list box when a client is selected.
Modifying
To modify client details, select the client then click the Modify button. Following this, the Modify Client window (see fig. below) is opened.
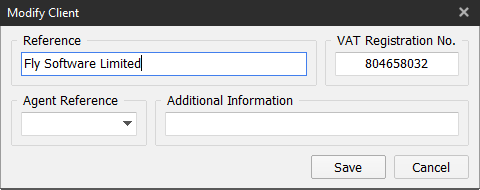
Fig. Modify Client window
For details about the fields contained in the Modify Client window, refer to Managing Clients > Adding.
NOTE: If Easy MTD VAT has been granted authority to interact with HMRC for the client, and the Agent Reference is changed, Easy MTD VAT will need authority granted again for the client if Easy MTD VAT has not already been granted authority for another client with the same Agent Reference. Returning the Agent Reference to what it originally was (blank or otherwise), automatically grants authority again to Easy MTD VAT for the client.
Click the Save button to save any changes and close the Modify Client window.
Deleting
To delete a client, select the client then click the Delete button. Following this, the Delete Client window (see fig. below) is opened.
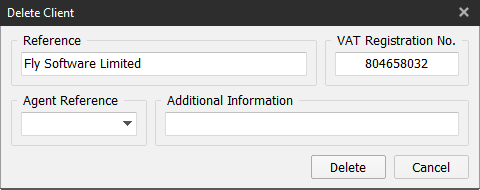
Fig. Delete Client window
Click the Delete button. Following this, a Confirm window is opened requesting confirmation of the delete. Click the Yes button to perform the delete and close the Confirm window and Delete Client window.
Granting Authority to Easy MTD VAT
Easy MTD VAT needs to be granted authority to interact with HMRC for each client. If authority is not granted it prevents VAT returns being submitted, and obligations, payments and liabilities being displayed for a client. How authority is granted depends on whether you are an individual submitting and displaying their own VAT figures, or an agent doing the same for its customers.
| Individual | An individual needs sign in credentials (User ID and Password) for a Government Gateway account associated with the selected client. Performing the authority process grants authority for Easy MTD VAT to interact with HMRC for this client only. |
| Agent |
An agent needs sign in credentials (User ID and Password) for a Government Gateway account that has authority to act on behalf of the selected client and all eligible clients with the same Agent Reference. Performing the authority process grants authority for Easy MTD VAT to interact with HMRC for all of these clients and eligible clients that are added or modified in the future with the same Agent Reference.* Click here for further instruction about agent authorisation and how to apply |
To grant authority for Easy MTD VAT to interact with HMRC for a client that is your own business or one or more clients that are managed by you as an agent, perform the following actions:
- Select the client associated with your business or a client that has the same Agent Reference as the other applicable clients you manage as an agent.
- Click the Authority button to open the Grant Authority window (see fig. below). The content of the Grant Authority window is taken from a HMRC web page.
- Read the notes provided then click the Continue button to open the Sign In page.
- Specify your Government Gateway User ID and Password then click the Sign in button.
- Following successful sign in, a page is opened requesting you to grant authority for Easy MTD VAT to view and change the client's VAT information. Click the Grant Authority button.
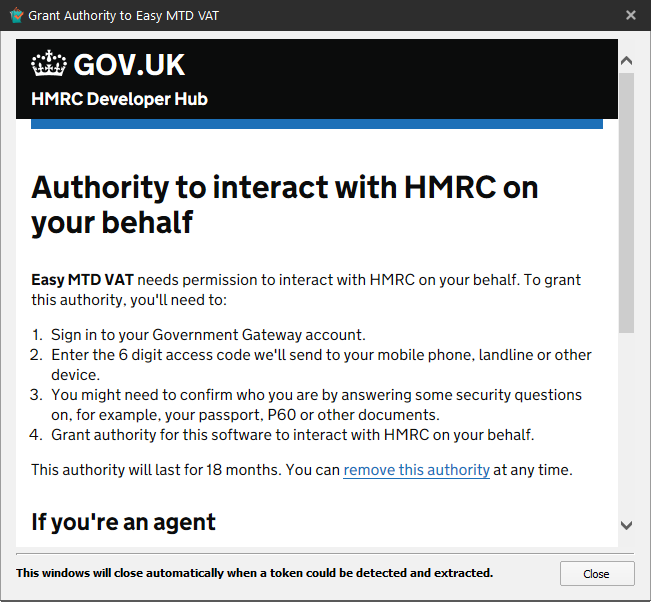
Fig. Grant Authority window
If granting authority is successful, the Grant Authority window is closed and an Authority Granted window is opened. Click the OK button to close this window.
NOTE: Authority is only granted for 18 months from the current date and it can be removed at any time.
NOTE: Granting authority again is permissible and it simply extends the period for which authority is granted.
NOTE: If you install Easy MTD VAT on another computer it will also need authority granted to it.
Removing Authority
To remove authority for Easy MTD VAT to interact with HMRC for a client that is your own business or one or more clients that are managed by you as an agent, perform the following actions:
- Select the client associated with your business or a client that has the same Agent Reference as the other applicable clients you manage as an agent.
- Click the Authority button to open the Grant Authority window (see fig. above). The content of the Grant Authority window is taken from a HMRC web page.
- Click the "remove this authority" link to open the Manage Authority page.
- Click the Start Now button to open the Sign In page.
- Specify your Government Gateway User ID and Password then click the Sign in button.
- Follow the instructions that appear on subsequent pages.
- Click the Close button at the bottom of the Grant Authority window to close the window.
Managing Obligations, Payments and Liabilities
As long as Easy MTD VAT has been granted authority to interact with HMRC for a client, their open obligations, fulfilled obligations, payments and liabilities can be managed.
Displaying
To display open obligations, fulfilled obligations, payments and liabilities, perform the following actions:
Selecting
To select an open obligation so it can be submitted, or a fulfilled obligation so it can be viewed, click it. A selected item is highlighted.
Specifying From and To Dates
To determine what obligations, payments and liabilities appear in associated panels, a date range can be specified using From and To dates.
By default, the From date is 12 months in the past and the To date is the current date. Both these dates can be changed as required but HMRC only allow you to view obligations, payments and liabilities within a maximum 12 month range.
Click inside the From date box or To date box then specify a date manually. Alternatively, click a calendar icon to open a Calendar window (see fig. below) where the day month and year can be selected.
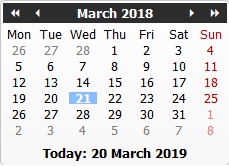
Fig.Calendar window
NOTE: Specifying a To date in the future is not permitted.
To return the date range to the default (one year in the past up to the current date), delete the dates in the From and To boxes.
Viewing Fulfilled Obligations
To view the submission receipts and VAT figures of a fulfilled obligation, select it then click the View button. Following this, a View VAT Return window is opened (see fig. below).
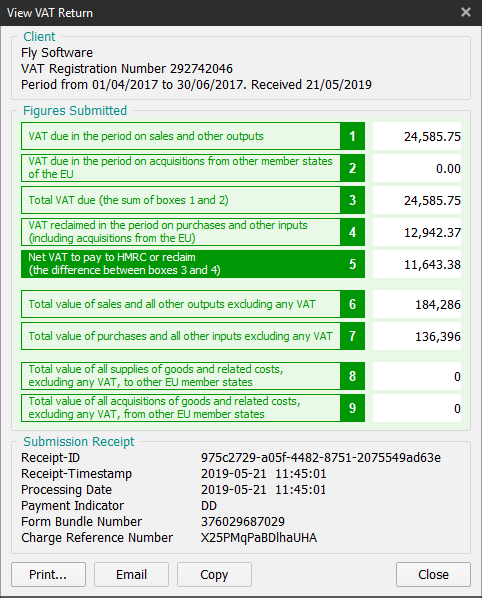
Fig. View VAT Return window
Click the Close button to close the View VAT Return window.
NOTE: Submission receipts can also be viewed in your account on the Easy MTD VAT website (https://easymtdvat.com).
Printing
To print the contents of the View VAT Return window, click the Print button. Following this, the standard Windows Print window is opened where a printer and printer settings can be specified prior to printing.
Emailing
To email the contents of the View VAT Return window using the default Windows email client, click the Email button.*
The subject of the email is formatted as follows:
VAT Return Submission. Period from : dd/mm/yyyy to : dd/mm/yyyy
*NOTE: If a default Windows email client is not specified then a window appears prompting you to select one. To change the default Windows email client, refer to your Windows documentation or help.
Copying to Clipboard
To copy the contents of the View VAT Return window to the Windows clipboard, click the Copy button.
Submitting a VAT Return
To submit a VAT return (or an open obligation as it is referred to in the Easy MTD VAT interface), select the associated open obligation then click the Submit button. Following this, a Submit VAT Return window is opened (see fig. below)*.
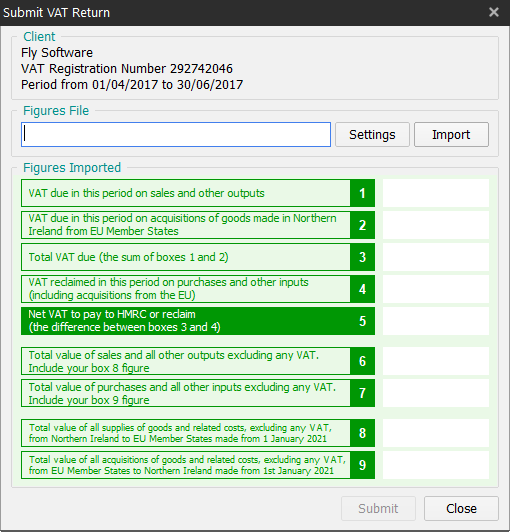
Fig. Submit VAT Return window
*NOTE: If you have not already specified your Fly Software account email and password, a Warning window is opened notifying you of this. Click the OK button to close the Warning window and open the Account window (see fig. above) where an email and password can be specified. When complete, click the OK button to close the Account window and continue with the VAT return submission process.
For further details about specifying your Fly Software account email and password, refer to Getting Started > Specifying Account Details.
Click the Close button at any time to cancel the VAT return submission process and close the Submit VAT Return window.
Importing VAT Figures
To submit a VAT return, associated VAT figures must be imported from an Excel spreadsheet or CSV file.
To import VAT figures, perform the following actions:
- Click the Import button to open the Import File window.
- Locate the Excel or CSV file where the VAT figures are stored.
- Select the Excel or CSV file.
- Click the Open button to close the Import File window.*
If the VAT figures are valid they will populate the Figures Imported panel of the Submit VAT Return window and an Import Successful window is opened. Click the OK button to close this window.
If the VAT figures are invalid or another issue is encountered, the reason will be reported in red in the Figures Imported panel of the Submit VAT Return window and a Warning window is opened. Click the OK button to close this window then correct the issue(s) in the Excel or CSV file before trying to import the VAT figures again.
NOTE: If the Not Used and/or Calculate checkboxes are enabled (ticked) in the Spreadsheet Settings window, associated figures appear in orange to indicate they have been automatically applied or calculated by Easy MTD VAT.
If a figures file is already specified, click the Import button to immediately import the associated VAT figures. If a new figures file needs to be specified, delete the existing path and file name in the Figures File text box then click the Import button.
*NOTE: If you are importing VAT figures from an Excel spreadsheet and if spreadsheet settings have not yet been configured for the selected client, the Spreadsheet Settings window (see fig. below) is opened.
For further details about configuring spreadsheet settings, refer to Submitting a VAT Return > Configuring Spreadsheet Settings.
For details about valid VAT figures, refer to Submitting a VAT Return > Valid VAT Figures.
For details about the CSV format, refer to Submitting a VAT Return > CSV Format.
NOTE: Once VAT figures have been imported they cannot be altered prior to submitting them to HMRC. This is to conform with Making Tax Digital for VAT requirements. If you need to make a change to the figures this must be performed in the Excel or CSV file before importing them again.
Submitting
When VAT figures have been successfully imported, click the Submit button. Following this, a Submission window (see figs. below) is opened. The content of this window is dependent on whether you are an individual submitting your own VAT return or an agent submitting on behalf of one of your customers (i.e. an Agent Reference is specified for the client).
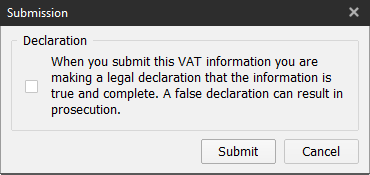
Fig. Submission window (individual)
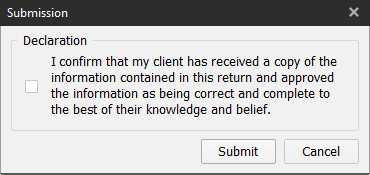
Fig. Submission window (agent)
NOTE: If the Not Used and/or Calculate checkboxes are enabled (ticked) in the Spreadsheet Settings window, the Submission window will also contain text notifying you of this.
Agree to the declaration by clicking (ticking) the check box then click the Submit button.
If there are one or more submission tokens available in your Fly Software account, the VAT Return is submitted digitally to HMRC and a Success window is opened notifying you of this. Click the OK button to close this window.
If there are zero submission tokens in your Fly Software account (or another problem is encountered), a Warning window is opened notifying you of this. Click the OK button to close this window then purchase one or more submission tokens (or rectify the problem) before attempting to submit the VAT return again.
For further details about buying submission tokens, refer to Getting Started > Buying Submission Tokens.
Configuring Spreadsheet Settings
Prior to importing VAT figures from an Excel spreadsheet, the sheet and cell where each VAT figure is located in the spreadsheet must be specified.
EXAMPLE: If a VAT return's Box 1 figure appears in a sheet called Sheet1 and a cell called B1 then specify Sheet1 for the Box 1 Sheet value, and B1 for the Box 1 Cell value.
In the Submit VAT Return window, click the Settings button to open the Spreadsheet Settings window (see fig. below).*
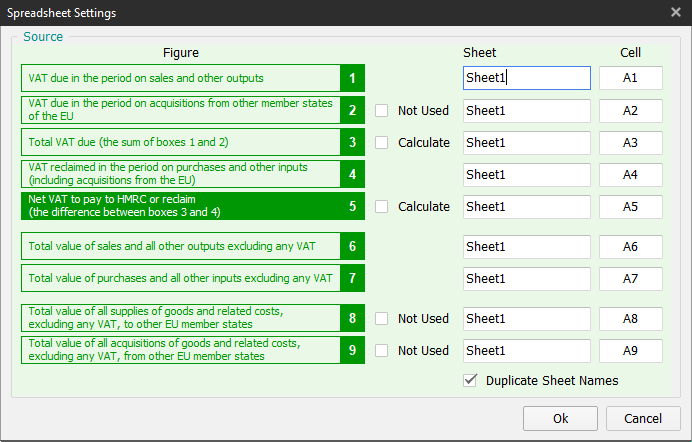
Fig. Spreadsheet Settings window
Use the Sheet and Cell text boxes to specify where in the Excel spreadsheet associated figures are held.
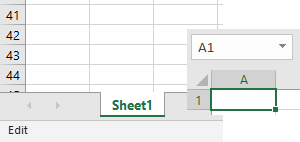
Fig. Example Excel sheet and cell
If all figures appear on the same sheet, tick the Duplicate Sheet Names check box so the name of the sheet only has to be specified once in any of the Sheet text boxes.
If box 2, 8 and/or 9 are not applicable (because the client does not deal with the EU) and associated figures do not appear in the spreadsheet, enable (tick) the associated Not Used checkboxes so Easy MTD VAT does not try to import figures but instead applies zero.
If box 3 and/or 5 do not appear in the spreadsheet, enable (tick) the associated Calculate checkboxes so Easy MTD VAT does not try to import figures but instead calculates them using HMRC rules.
When all sheets and cells are specified, click the OK button to save the settings, close the Spreadsheet Settings window and import the figures (if a valid figures file is specified).
NOTE: Spreadsheet settings are associated with the selected client meaning each client has their own spreadsheet settings.
*NOTE: The Spreadsheet Settings window is also opened when you import VAT figures from an Excel spreadsheet if spreadsheet settings have not already been specified for the associated client.
CSV Format
To successfully import VAT figures from a CSV file, the VAT figures must be presented on the FIRST LINE of the file in the following way:
Box 1,Box 2,Box 3,Box 4,Box 5,Box 6,Box 7,Box 8,Box 9
EXAMPLE:
24585.75,0.00,24585.75,12942.37,11643.38,184286,136396,0,0
Valid VAT Figures
Before a VAT return can be submitted to HMRC using Easy MTD VAT, the VAT figures imported from either an Excel spreadsheet or CSV file must adhere to the following rules:
| Box | Description | Rule | Excel Cell Format |
|---|---|---|---|
| 1 | VAT due in the period on sales and other outputs | 2 or less decimal places | Number. 2 decimal places |
| 2 | VAT due in the period on aquisitions from other member states of the EU | 2 or less decimal places | Number. 2 decimal places |
| 3 | Total VAT due | Sum of box 1 and box 2. 2 or less decimal places | Number. 2 decimal places |
| 4 | VAT reclaimed in the period on purchases and other inputs (including acquisitions from the EU) | 2 or less decimal places | Number. 2 decimal places |
| 5 | Net VAT to pay to HMRC or reclaim | Either box 3 - box 4 or box 4 - box 3, whichever produces a positive value. 2 or less decimal places. Click here for more information about how to deal with this box value. | Number. 2 decimal places |
| 6 | Total value of sales and all other outputs excluding any VAT | Whole number | Number. 0 decimal places |
| 7 | Total value of purchases and all other inputs excluding any VAT | Whole number | Number. 0 decimal places |
| 8 | Total value of all supplies of goods and related costs, excluding any VAT, to other EU member states | Whole number | Number. 0 decimal places |
| 9 | Total value of all acquisitions of goods and related costs, excluding any VAT, from other EU member states | Whole number | Number. 0 decimal places |
NOTE: From version 1.4.1.4 of Easy MTD VAT, values for box 6, 7, 8 and 9 are automatically converted to whole numbers when imported if they are not already whole numbers in the Excel spreadsheet or CSV file.
Troubleshooting
If you encounter an issue or would like to learn more about Easy MTD VAT, the following resources are available:
