How do I configure the Spreadsheet Settings in the Submit VAT Return window?
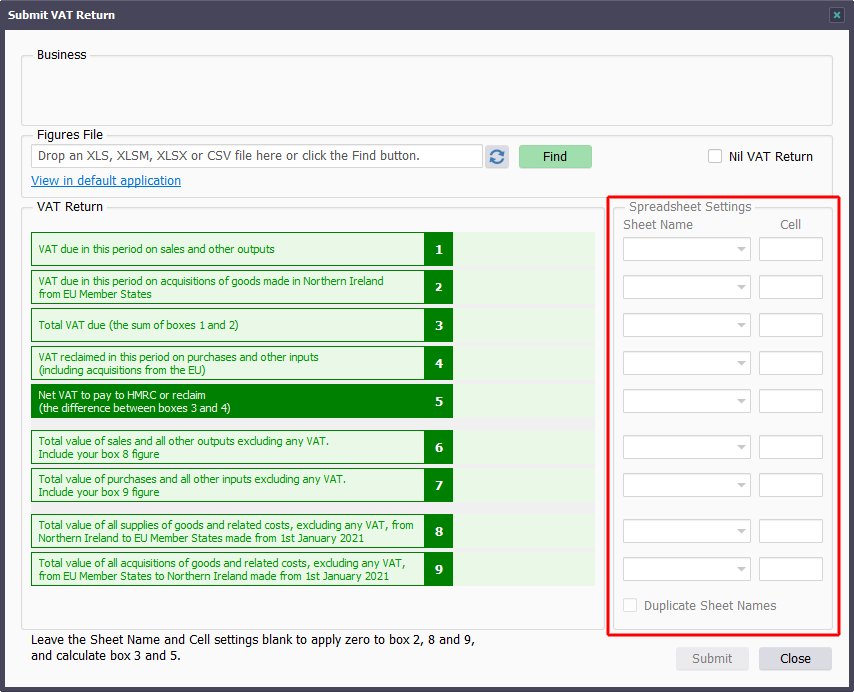
The Spreadsheet Settings in the Submit VAT Return window (see fig. below) let Easy MTD VAT know where in your selected spreadsheet each of the 9 box figures are located.

Fig. Submit VAT Return window with the Spreadsheet Settings highlighted
NOTE: To enable the Spreadsheet Settings, a spreadsheet must be selected (use the Find button or drop the spreadsheet file inside the Submit VAT Return window).
There are two Spreadsheet Settings for each box figure:
| SETTING | DESCRIPTION |
|---|---|
| Sheet Name | Determines the sheet (page) within your spreadsheet where the associated box figure is located. e.g. Sheet1 |
| Cell | Determines the cell within your spreadsheet where the associated box figure is located. e.g. B2 |
Determining and Selecting a Sheet for a Box Figure
To determine the sheet where a box figure is located in your spreadsheet, perform the following actions:
- Open your spreadsheet. You can do this in the normal way or by clicking the "View in default application" link in the Submit VAT Return window.
- Find the associated box figure in your spreadsheet.
- Make a note of the sheet name where the box figure appears. In Excel, this is normally indicated by a sheet tab located at the bottom left of Excel (see fig. below).

Fig. Example sheet tab (the name is Sheet1)
Now you know the sheet where a box figure is located, you can select it for the corresponding box in the Submit VAT Return window. Do this by clicking the associated Sheet Name setting then clicking the corresponding option. For example, if the figure for box 1 is located in a sheet called Sheet1 within your spreadsheet, select the Sheet1 option from the box 1 Sheet Name setting list box (see fig. below).

Fig. Example Sheet Name selection
Determining and Specifying a Cell for a Box Figure
To determine the cell where a box figure is located in your spreadsheet, perform the following actions:
- Open your spreadsheet. You can do this in the normal way or by clicking the "View in default application" link in the Submit VAT Return window.
- Find the associated box figure in your spreadsheet.
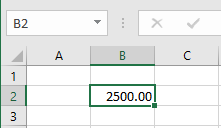
- Make a note of the cell where the box figure appears. In Excel, this is indicated by a letter followed by a number (see fig. below), e.g. B2. The letter indicates the column and the number indicates the row. Clicking inside the cell normally displays the cell letter and number within the Excel interface.

Fig. Example cell (the value is in cell B2)
Now you know the cell where a box figure is located, you can specify it for the corresponding box number in the Submit VAT Return window. Do this by clicking inside the associated Cell setting then typing the cell value. For example, if the figure for box 1 is located in cell B3 within your spreadsheet, specify B3 for the box 1 Cell setting.

Fig. Example Cell specification
Dealing with Missing Box Figures
Your spreadsheet may not contain certain box figures because they may not be applicable to your business (e.g. box 2, box 8 and box 9 because you do not deal with the EU), or you have not calculated them (e.g. box 3 and box 5). When this occurs, simply leave the associated Sheet Name and Cell settings blank in the Spreadsheet Setting window. For box 2, box 8 and box 9, Easy MTD VAT will apply 0.00 or 0 for the associated figure. For box 3 and box 5, Easy MTD VAT will calculate the associated figure.
